The official rules for touch rugby field dimensions are 70 meters long and 50 meters wide.
However, games are often played on a reduced area of a standard rugby field. You may also encounter all-purpose fields without line markings. In both cases, a few cones may be needed to get the right pitch size for touch rugby.
We’ll cover all bases in this article. If you’re rocking up for your first touch session, you’ll learn exactly what size of field to expect. By the way, we’ll interchange between “field” and “pitch” – they both mean the same thing.
Official Touch Rugby Field Dimensions
The Federation of International Touch Rugby has these standards for the dimensions of a touch rugby field:
- Length of 70 meters
- Width of 50 meters
Official Field Markings
The FIT rules state that the touch rugby field should have these markings:
- Two Sidelines
- One Half-way line
- Two Scorelines ( or try lines)
There’s a reason for this length and width for a touch rugby pitch. The common dimensions of a pitch for fifteens rugby are 100 meters long and 70 meters wide. So, what’s that got to do with touch rugby?
Many touch rugby clubs and tournaments share the pitches of a local rugby club.
Touch Rugby Field Sizes At Rugby Clubs
When you play touch rugby on a standard Rugby Union pitch, you’ll probably be playing “across” the field.
Remember, the standard width for fifteens rugby is 70 meters. That happens to be the length of a touch rugby field. This allows the touch game to use the club field’s sidelines either as the scoreline or sometimes the dead-ball line.
This is probably easier to visualize with a picture! The diagram below shows the standard rugby pitch, complete with goalposts at each end. The red box shows how the touch rugby pitch fits into one half of the standard field.
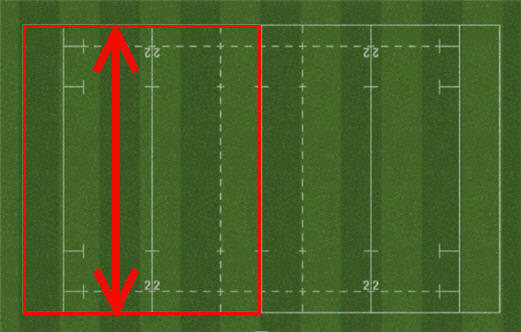
If you’re wondering about the horizontal dashed lines – this marks 5 meters in from the sideline in a game of rugby union. A legitimate lineout throw has to make it to the 5-meter line. We don’t have lineouts in touch rugby so we won’t worry about this.
Sometimes there isn’t enough of a boundary between the sidelines of a standard pitch and the spectator area or pathways. If that area is inappropriate for a scoring zone, then the sidelines will mark the end of the in-goal area.
You may see two practice matches – or competitive games – played simultaneously. This is more likely at lower age groups when the width of the field will be reduced a little more.
The Impact Of Field Size On Touch Rugby
Now that we know the dimensions of a standard rugby pitch versus touch rugby, let’s do some back-of-napkin calculations.
Consider the width of the standard pitch and how much space each rugby 15s player has. Imagine that the players are lined up horizontally and evenly spaced (a little unrealistic, I know).
The fifteens player has 70 meters divided by 15 = 4.7 meters in which to operate.
The touch rugby player has 50 meters divided by 6 = 8.3 meters. Whoo-hoo. All that freedom to express yourself!
Touch rugby players have more space and gaps to attack. However, we also have more space to cover defensively! This requires a certain level of fitness to be enjoyable.
Touching Up The Markings On A Touch Rugby Pitch
A town or county council may have provided playing pitches that are designated for Touch Rugby. So instead of using cones on half a standard rugby pitch, you’ve actually got the official touch rugby markings.
What if you’re asked to help touch up faded markings at the start of a season? I’m assuming that an experienced organizer has asked for volunteers.
My main hint is to wear old clothing that you don’t mind getting splattered with paint or paste.
If you’re the one actually rolling the lines, don’t start until the area has been brushed to clear any debris. Muck and debris can gum up a rolling machine.
What else? Do your best to keep to the faded old lines!
Marking Out A New Touch Rugby Pitch

If your club or social group has been handed a field by a local council, then here’s my best advice. Get the council to include the markings as part of the deal. They will likely secure a commercial groundskeeping outfit.
When that’s not an option, then here are my best tips.
Tip #1 – some expertise
Scour your group for a surveyor – or for anyone who is related to or is best friend with a surveyor. Getting the angles right is key.
Tip #2 – prepare the pitch in advance
Brush the target areas thoroughly, especially if you’re using a rolling machine. The wheel can pick up debris that gets stuck in the machine.
Tip #3 – assemble your equipment
Here is the bare minimum of what you’ll need:
- Strong cord (at least 120 meters)
- Wooden tent pegs and/or metal pegs
- Mallet
- Surveyor’s tape measure
- Equipment for measuring angles (could be a protractor but I’d rather a surveyor!)
Tip #4 – only use approved whitewash
This is important. It was common a few decades ago for groundskeepers to use whitewash solutions that were damaging to biological material. The aim was to keep grass from growing along the marked lines. Those choices are likely illegal now in your area.
I’m referring to stuff like creosote or hydrated lime. These are now highly restricted in many countries.
An older teammate may try to be helpful and offer ancient cans of “whitewash” from the back of his storage shed. If you’re using second-hand cans, make sure that the material is legal for its use. Check with your local council.
You’ll be fine when buying new from the “line markings” sales page of an established sports equipment outfit.
Tip #5 – work from out to in
Start with the external lines. Here’s a possible sequence:
- Identify the corners of the perimeter of your pitch
- Start with one goal line
- Drive in a peg at one end
- Drive in a peg at the other end of the target line
- Attach the cord to a peg and run it from peg to peg
- Run the roller along the cord for a straight line
- Repeat for the second goal line
- Identify a 90-degree angle to the goal lines
- Do one touchline
- Do the other touchline
- Measure the half-way point along the touchlines
- Mark the halfway line